Breaking News! Monstrobot Crafted!

James Cha's Monstrobot
[ see also Fiery Warpath Walkthrough ]

While yours truly was catching up on some desparately needed sleep, James Cha crafted the first monstrobot. Ah, Mousehunt, you snooze, you loose (or miss something, in this case :)

  • Power: 8000 physical
  • Power Bonus: 20%
  • Attraction Bonus: 5%
  • Luck: 27
  • Cheese Effect: No Effect
Recipe
  • 1 set of DeathBot Parts
  • 1 set of Digby DrillBot Parts
  • 1 set of RhinoBot Parts
  • 2 pieces of Sandblasted Metal
  • 400 Flameshards
  • 1 set of Sandstorm MonstroBot blueprints

Fiery Warpath - Crafting Items

  • awarded for defeating Warmonger
  • NOT consumable, thus, after the first pass through the Fiery Warpath you are allowed to buy either (or both) sets of blueprints if you can beg, borrow, purchase, etc., the needed trap loot. After the third time through, you can buy the Sandstorm MonstroBot BPs if you can get the trap loot.
  • dropped by Warmonger
  • used to craft Oasis Water Node
  • dropped by Warmonger
  • used to craft Sphynx Wrath
  • dropped by Warmonger
  • used to craft Monstrobot
  • dropped by cavalry
  • used to craft Warpath Cavalry Charm, Super Warpath Cavalry Charm
  • dropped by mages
  • used to craft Warpath Mage Charm, Super Warpath Mage Charm
  • dropped by Warmonger
  • used to craft (Super) Warpath Cavalry Charm, (Super) Warpath Mage Charm

Fiery Warpath - Streaks

[ ^ Contents | << Waves | >> New Weapons ]
Streaks, Explained

A streak is series of catches, of the same mouse in a row. A FTA, FTC or catch of another type of mouse breaks a streak.

For every multiple of 3 in a streak, you cause two extra mice to 'retreat' (they are removed from your wave). Streaks do not appear to apply to Theurgy Wardens, which makes sense as they are the only thing in wave 4 other than the Warmonger, lol.

For example, if you catch three desert archers in a row, two desert archers retreat. If you then immediately go on to catch three more desert archers, four more desert archers retreat. At this point, you have a streak of six desert archers and a total of six more desert archers have retreated, for a total of 12 desert archers removed from the 35 original desert archers that was your goal. If you then go on to catch another three desert archers with no FTAs, FTCs, or catches of other mice, making a streak of nine, six more desert archers will retreat, for a total of 9 catches + 12 retreats = 21 removed from your goal.

Demoralizing mice by capturing a Crimson Commander

Note, however, that you can have a streak of 4 or 5. This fact is important when considering the effect of catching a Crimson Commander.

By capturing a Crimson Commander Mouse I demoralized the remaining mice in this wave! My current streak was 8. 8 of each mouse have retreated!

When you capture a Crimson Commander, wherever you are in a streak, that number of each mouse retreats. We had early reports of catching a Crimson Commander without the demoralizing effect taking place, but none in quite some time, so perhaps that was a glitch. It is possible to clear the rest of a mouse this way (if you have 7 Sentinals left to go and 8 of each mouse retreat you are done with Sentinals.) Ever wonder what would happen if a Crimson Commander is the first mouse you encounter? Lisa R. found out for us; 1 of each mouse retreats.

Crimson Commanders can be encountered at any time, although the probability appears to be quite low. Using sb+ increases the chances of encountering a Crimson Commander.

Caravan Guards: Getting Caught Streaking
Strength in numbers! After I failed to catch a Caravan Guard Mouse, members of my hunting party were able to prevent the mouse reinforcements from arriving!

If you fail to catch a Caravan Guard and you are hunting solo (no friends online), reinforcements will arrive (your target mouse count will increase.) How many reinforcements? Good question! See Caravan Guards for more information.

Your main protection from this dastardly fate is to hunt with friends: if you miss your Caravan Guard, your chances of reinforcements arriving are smaller the more friends you have online. Using sb+ as bait also reduces the chances of attracting Caravan Guards, although it does not eliminate it.

Getting smushed by the Gargantuamouse.
Fearing that I was gaining the upper hand, the Warmonger released a Gargantuamouse, putting an end to my streak.
Our understanding of how Gargantua works is continuously evolving. This explanation reflects my best shot at interpreting the current info, but is guaranteed to be obsolete five minutes after I publish it. HJH

After seven catches in a row, the Warmonger releases the Gargantuamouse in an attempt to slow you down. You have an increasing probability of encountering the Gargantuamouse, until after the ninth catch when it is extremely likely. The chances of encountering Gargantua increase by a polynomial equation (not exponential) as the streak progresses. No hard limit is set on the length of a streak: if you can keep dodging Gargantuas, you can keep going! (For more on Gargantuamice, see the Gargantuamouse entry in the strategy guide.

Fiery Warpath - Mice

Mouse Group: The Marching Flame
The order in which trap types are listed within a category (for example, 'less effective') is significant.

see also Hilary's Visual Reference for the Sandtail Desert Mice

Physical Subgroups: Warrior, Scout and Archer
  • Effective: physical
  • Less effective: hydro, tactical
Warrior
wave 1 Desert Soldier (2400 G, 11500 P)
wave 2 Flame Warrior (3000 G, 18000 P)
wave 3 Crimson Titan (3300 G, 20000 P)
Scout
wave 1 Vanguard (2600 G, 14000 P)
wave 2 Sentinel (3300 G, 21300 P)
wave 3 Crimson Watch (3600 G, 24200 P)
Archer
wave 1 Desert Archer (2100 G, 12800 P)
wave 2 Flame Archer (2700 G, 19900 P)
wave 3 Crimson Ranger (3000 G, 22000 P)
Strike Force Subgroups: Cavalry, Mage and Artillery
Cavalry
  • Effective: tactical
  • Less effective: physical, hydro
wave 2 Sand Cavalry (5200 G, 24000 P)
wave 3 Sandwing Cavalry (6000 G, 26400 P)

drop desert horseshoe: seen 1..3 (thx Praveen!)
Mage
  • Effective: hydro
  • Less effective: physical, tactical
wave 2 Inferno Mage (1000 G, 26500 P)
wave 3 Magmarage (1000 G, 30000 P)

drop heatproof mage cloth: seen 1..3
Artillery
  • Effective: arcane
  • Less effective: hydro, physical, tactical
wave 3 Flame Ordnance (1600 G, 33000 P)
Support Mice (no subgroups):
  • less effective: physical, hydro, tactical
(900 G, 900 P)
  • very effective: hydro, draconic, physical, arcane, tactical
(1000 G, 10000 P)
waves 1, 2 and 3
  • very effective: draconic; less effective: arcane, hydro, tactical, physical
  • drop flameshards!! (seen 1 to 6 dropped)
(4000 G, 25000 P)
waves 1, 2 and 3 after seventh catch in a streak
Wave 4 Mice:
  • effective: physical; less effective: hydro, tactical
(3000 G, 81000 P)
drops 0 to 10 Flameshards
may drop 2 simple orbs
Warmonger Boss Mouse!
  • effective: physical (but only after all the Theurgy Wardens have been captured)
  • less effective: hydro, arcane, tactical (but only after all the Theurgy Wardens have been captured)
(27000 G, 198000 P)
drops zero or one pieces of loot needed for each of the new traps (pattern? drops 1 first catch, harder next catch - use ULC?
drops 1 Ultimate Luck Charm (always?)
drops 2 Ultimate Power Charms (always?)
may drop 1 to 2 Warpath Commander Charms
drops heaps and heaps of flameshards (100 first time, 150 second time?)

Fiery Warpath - Strategy Guide

An Elegant Design

The Fiery Warpath (FW) is truly an elegant design. Many different optimal paths exist, depending on what it is that a hunter is optimizing: points, gold, speed, types of loot and more, as well as the hunter's equipment, style of hunting and many other characteristics. You don't need to become a MouseHunt guru to do well in FW, but there are some essentials that, once internalized, will let you surf the waves repeatedly with growing confidence on each pass. My goal is to provide you with those essentials.

A new concept is introduced in the Fiery Warpath: momentum. In addition, the mechanisms of selective attraction and selective effectiveness, introduced in Zugzwang's Tower, are expanded upon. If you focus on the concepts rather than the mechanics at first, the mechanics will flow.

I assume that you have read (or at least skimmed) the rest of the walkthrough, especially the sections on waves and streaks before you read this guide. I start with an in-depth discussion of Crimson Commanders, Gargantuamice and Caravan Guards, mice which are critical to the implementation of momentum in FW. I then move on to explore the implications for strategies for each wave for various goals.

Table of Contents
  1. Crimson Commander Mice
  2. Gargantuamice
  3. Caravan Guards NEW
  4. Wave 1
  5. Wave 2
  6. Wave 3
  7. Wave 4
  8. Advice for passive hunters

Breaking News!! Scandal in Larry's intel division!!

Update: March 28, 2011, 22:54 UTC. This glitch, Michele Spencer says, has been fixed :) Thanks, HitGrab, that's good to know!

Jan-Marie Kellow caught a Warmonger after catching only two Theurgy Wardens, demonstrating severe deficiencies in Larry's intelligence gathering division.
Be warned that although the Warmonger Mouse can be encountered at any time during this wave, they will be immune to capture until you have defeated all of the Theurgy Warden Mice that guard them.

Jan-Marie's heads-up display shows the Warmonger as defeated and has recorded her first victory. Will she get a second shot at the Warmonger once she has finished off the rest of the wardens? Stay tuned for further developments....

Doh! And the answer is "no!" Talk about anti-climactic, lol. Once she finished off the last warden, Jan-Marie found herself back at Wave 1 of her second pass through the Fiery Warpath.

Our intrepid Jan-Marie demonstrating that Larry's intel on the Fiery Warpath is less than perfect.

Warning! Hunters bumbling about in the dark!

Good grief, what am I doing here?

As Jester told you in the introduction to the Fiery Warpath walkthrough, he has invited me to join him as an author on MouseHuntGuide. What he was gracious enough not to tell you is that I had the temerity to try to invite myself as such nearly a year ago when I knew diddly (a highly technical term) about MH. Luckily, he was sweet enough not to pitch me out of his life on my ear. Now I know at least ten times diddly (for the mathematically inclined, ten times diddly equals squat), but at least I know that I know squat. So I guess Jester decided that meant I was ready to help out.

While we sort out the mechanics of collaborating on Blogger (at present I cannot update my own work-in-progress, ROFL) I'm going to post what I think are crucial updates and integrate them later.

The first of those is a strategy update for wave 2.

While Zugzwang's First Move (ZFM) would be preferable over Rewer's Riposte (RR) if you have Cavalry charms, the first pass through wave 2 all but the wealthiest hunters will not. Once you have defeated the Archers, Scouts and Warriors you will be left with roughly twice as many Cavalry as Mages. If you are lucky and encountered a Crimson Commander at an opportune time, you will not face the full count, but the ratio will remain the same. If Sand Cavalry and Inferno Mages are equally attracted to your bait, the odds favor arming a tactical trap and a luck charm as, on average, two out of three encounters will favor the tactical setup.

Here is the light bulb (ding!) that went off over my head today while whittling away at those dratted Flame Archers (how embarrassing, archers....) In that first pass through wave 2, without charms, choose your RR rather than your ZFM. Why? Because we are always told to arm our luckiest trap when we do not have the right trap type. In this case going with the luck setup is the smart choice as it will improve the outcome for the balance of the encounters, for which the tactical setup is less effective. Not to mention that the usual argument in favor of power (consistency) is not in play without charms.

A second, much smaller update is that I have downgraded Summer Mage (and therefore the anticipated Winter Mage) to unverified, as I have yet to receive a single documented drop.

Aha! Looks like we're making technical progress. Yayyy!

More to come....

Hilary

Fiery Warpath - Entry Requirements

[ ^ Contents | >> Fiery Warpath Mice ]

Although you need to be a Baron(ess) to travel to the Fiery Warpath, you can complete all the preliminaries beforehand.

  1. Preliminaries: First, you must prove yourself ready to be called up to the battle by completing two preliminary tasks. You may complete these tasks in either order:
    • Catch the Silth (arm HB/DDA with Magma/SBB and Wicked Gnarly)
    • Catch the Technic and Mystic Kings
  2. Collect a Sandtail Call to Arms
Preliminaries
Catching The Silth

The big question that I get asked is whether to arm the HeatBath (HB) or Double Diamond Adventure (DDA). We do not have a large enough unbiased set of data (I'll talk about bias in data collection in another post) to give a definitive answer based on statistical analysis. Models such as the Furoma model, while useful, are always least reliable in answering questions at the extremes, especially when the differences in outcome are quite small.

That is the important piece of information to remember. Catching the Silth is difficult, and ultimately an exercise in persistence. Ignore your friends who tell you they caught it on their third hunt and just keep at it. Oh, right, HB or DDA? My pick is DDA, not necessarily because, for every fifty hunters who follow this advice, one of them will catch the Silth two hunts faster as a result (statistic chosen at random), but because you will get more loot from the other mice while you are hunting for the Silth. Goblins drop flawless orbs, Cyclops and hydras drop simple orbs and harpies drop divine orbs, not to mention various other goodies that get dropped. So use your DDA and collect the loot. Which base? Your Spellbook base. What? You don't have a Spellbook base yet? Are you nuts? If you venture into the Fiery Warpath without a Spellbook base you will be fried to a crisp. Off to Zugzwang's Tower with you....

Catching the Technic and Mystic Kings

You must be joking, right? That is a different walkthrough, folks!

Collecting the Sandtail Call to Arms

The Sandtail call to arms is dropped by specific mice in the seasonal garden. You must have caught your Silth and one each of both Kings in ZT before the mice with drop the Sandtail call to arms. Note that the setup advice is all first-order guesswork and is guaranteed to be at least somewhat wrong!

Spring
  • Spring familiar (high probability of drop, although not 100%)
  • Puddlemancer (low probability of drop)

Craft your Enraged Rhinobot and use that, as you'll want it anyway. Use it with Spellbook Base (SBB) (1st choice), Magma Base (2nd choice), Molten Shrapnel Base (MSB) (3rd choice).

Summer
  • Summer mage
  • Firebreather (decent probability of drop)

The Rewer's Riposte (RR)'s catch rate is pretty terrific and the Firebreather's drop rate is pretty good, so use your RR if you have one, as it has much higher luck and will thus increase the likelihood of the drop. Fallback option is Zugzwang's First Move (ZFM). Don't go into Fiery Warpath without ZFM. Use either trap with Magma (1st choice), MSB (2nd choice).

Fall
  • Fall familiar (high probability of drop, although not 100%)
  • Harvest harrier (low probability of drop)

Seriously? Haven't you learned any patience playing this game? Wait until Winter! Oh, all right... Use your Cackle Lantern Trap (CLT) if you have one, or Clockapult of Time (COT), if not. Otherwise, go collect Simple Orbs until Winter. You'll thank me. Meanwhile, go write your mother a nice thank you note. And call her. When was the last time you called your mother, anyway? Use CLT with Magma / MSB and COT with SBB.

Thanks, Karina, for the heads up on the fall mice. Nice to know when I got a guess right :)
Winter
  • Bruticle

Here it depends on your bait and whether you own a Magma base. If using Gouda, go ahead and use your Double Diamond Adventure (DDA) or Kraken Chaos (KC) if you have one, with either Magma or MSB. If using SB+, use HeatBath (HB) by preference, falling back to DDA and KC. With HB, stick with MSB. You might even consider using SBB.

Fiery Warpath - Waves

[ ^ Contents | << Fiery Warpath Mice | >> Streaks]
A streak of three desert soldiers after returning to the Fiery Warpath during Wave 1. The area is NOT like Zugwang's Tower; progress is not reset upon leaving.
Most of the Fiery Warpath mice come in waves, although some of the mice are administrators ("support mice") and so are around all the time. One mouse, the Gargantuamouse, is released only on specific conditions, described in Streaks. To move on to the next wave, you have to defeat a specified number of each mouse in your current wave. In wave 1, your initial goal is 35 of each mouse, although that number can both decrease and increase as described in Streaks. Your progress is displayed in the HUD display.

see also Hilary's Visual Reference for the Sandtail Desert Mice

Support Mice (administrators!)
  • Caravan Guard
  • Crimson Commander
Wave 1:
  • 35 Desert Soldiers (warrior)
  • 35 Vanguards (scout)
  • 35 Desert Archers (archer)
Wave 2
  • 40 Flame Warriors (warrior)
  • 40 Sentinals (scout)
  • 40 Flame Archers (archer)
  • 45 Sand Cavalry (cavalry)
  • 20 Inferno Mages (mage)
Wave 3
  • 50 Crimson Titans (warrior)
  • 50 Crimson Watch (scout)
  • 50 Crimson Rangers (archer)
  • 60 Sandwing Cavalry (cavalry)
  • 30 Magmarage (mage)
  • 20 Flame Ordnance (artillery)
Wave 4
  • 12 Theurgy Wardens
  • 1 Warmonger
  • no support mice!

Fiery Warpath - New Weapons

[ ^ Contents | << Streaks | >> Crafting Items ]
Trap Loot

Each time you defeat the Warmonger, among other goodies, you are awarded a warpath victory. It turns out that the warpath victories are not consumable items (credit: James Cha), which is great news! Thus, you could craft both the Sphynx Wrath and the Oasis Water Node after your first pass through the Fiery Warpath even if the Warmonger did not drop any of the trap loot if you were rich enough to buy the necessary loot in the Marketplace. Very interesting, yes?

The pattern in which the Warmonger drops the trap loot continues to evolve. So far the pattern seems to be that he drops one of:

on the first catch. It is far more difficult to get him to drop one of the above on the second drop (try ultimate luck charms), although it is possible.

Enraged Rhinobot: (NOT smashable)
Digby scientists were hard at work trying to improve upon the already amazing RhinoBot when a fluke of chance led to the creation of the Enraged RhinoBot! The pure platinum cogs make it practically indestructible and a machine of pure raging power! It is hard to say whether the scientists think their masterpiece a success or a failure because since the Enraged Rhinobot has emerged from their labs, no one has been able to discover their whereabouts.
The Ragebot is not loot from the Fiery Warpath so much as a trap needed to hunt there. It is also a wonder in Derr Dunes for those hunters not possessing a Chrome Drillbot.
  • Power: 5900 physical
  • Power bonus: 10%
  • Attraction bonus: none
  • Luck: 20
  • Cheese effect: Insanely Stale
Recipe:
  • 3 Rhino horns
  • 6 Platinum bars
  • 1 Rhinobot parts
  • 48 Stale SB+ (Runic, when staled, becomes stale sb+)
Working with some clever trapsmiths and the oasis bead you were able to create a tunnel of water and give it a mind of it's own. While on standby the trap simply looks like a still pool of fresh water in a beautiful desert oasis, however any mouse it encounters will be snatched up and rocketed through the water tunnel to whatever destination you've set, be that Davy Jones Locker or another continent. If this were big enough for a human and much safer, one might consider using it for a more cost effective travel method...
  • Power: 5200 hydro
  • Power bonus: 12%
  • Attraction bonus: 10%
  • Luck: 20
  • Cheese effect: No effect
Oasis Water Node Blueprints (1 warpath victory, 800,000g)
This trap design may appear as a beautiful desert oasis, but below the sand is a masterfully crafted tunnel full of water brought to life by a thousand Living Shards. A splash of coconut milk has been superheated using Flameshards to produce a unique cheese-bearing palm tree that provides a healthy attraction bonus.

Having read this guide, you have been hoarding your flameshards and spending your nights in Digby collecting living shards, so you'll be set to craft your Oasis Water Node, using the recipe discovered by Paul Chambers:

  • 1 Coconut Milk
  • 1000 Living Shards
  • 150 Flameshards
  • 1 Oasis Bead
  • 1 set of Oasis Water Node Blueprints
The intention of this trap was to pay homage to a mythical creature known only for it's unparalleled mouse hunting prowess. Outfitted with a slew of clever traps it came as quite the surprise when the trapsmith who designed this tool of destruction found it utterly destroyed by it's [sic] own means, the statue untouched. It is believed the simple traps were insult enough to the spirit of this creature that they simply destroyed themselves in it's [sic] presence.
  • Power: 6100 tactical
  • Power bonus: 10%
  • Attraction bonus: 10%
  • Luck: 25
  • Cheese effect: very fresh
Sphynx Wrath Blueprints (1 warpath victory, 900,000 G)
These blueprints outline how to encase a rare Sphynx Crystal in gold leaf to unleash a fearsome feline mouse adversary. Upon a mouse approaching the mighty sphynx, the power of Flameshards summon her to sentience, unleashing an unrivaled tactical mouse adversary.

Sphynx Wrath is invaluable against the Sandwing Cavalry in Wave 3. Use the recipe discovered by Sharon Nakauchi.

  • 28 Gold Leaf (thanks, Alan!)
  • 200 Flameshards
  • 1 Sphynx Crystal
  • 1 set of Sphynx Wrath Blueprints
Encased in metal that has stood the test of extreme weathering and time, the Sandstorm MonstroBot is outfitted with the most advanced technologies. Should a mouse be lucky enough to escape its heat sensor tracking and turbo lasers, they are still left to face its sheer size and hardened fists. One MonstroBot alone could take out three Digby DrillBots at once...easily. Thankfully, its tastes are of the more furry rodent variety!
  • Power: 8000 physical
  • Power Bonus: 20%
  • Attraction Bonus: 5%
  • Luck: 27
  • Cheese Effect: No Effect
Sandstorm MonstroBot Blueprints (3 warpath victories, 999,000 G)
In the midst of the Santail [sic] Desert battle, the most experienced of the local trapsmiths have drafted plans for a massive physical trap of unmatched power. The Sandstorm MonstroBot harnesses the power of Flameshards to fuse heavy pieces of rare Sandblasted Metal to RhinoBot Parts.

Recipe (credit James Cha)

  • 1 set of Digby DrillBot Parts
  • 1 set of RhinoBot Parts
  • 2 pieces of Sandblasted Metal
  • 400 Flameshards
  • 1 set of Sandstorm MonstroBot blueprints

Fiery Warpath - Charms

[ ^ Contents | << Crafting Items | >> Strategies ]
Overview

The regular charms increase the encounter rate of that particular subgroup of fiery warpath mouse to your trap. They are helpful in wave 1, but fare poorly after that.

The super charms 'significantly' increase the encounter rate of the specified subgroup and add a subgroup-specific power bonus as well.

Neither type of charm reduces FTAs!

All the charms are only consumed when they attract a mouse from the correct subgroup.

Fiery Warpath Charm Shoppe
Regular charms: 1 ionized salt and 350 gold per piece
Super charms: 1 magic essence and 100 gold per piece
Crafted Fiery Warpath Charms
FW charm base:
  • 1 simple orb
  • 2 charm bits
  • 1 ionized salt
FW super charm base:
  • 1 simple orb
  • 2 charm bits
  • 1 magic essence
All that is left is to add the appropriate crafting agent to produce the desired charm:

Warpath Cavalry CharmSuper Warpath Cavalry Charm
  • 1 desert horseshoe
Warpath Mage CharmSuper Warpath Mage Charm
  • 1 heatproof mage cloth
Charms dropped as loot in FW
Warpath Commander's Charm:
  • Awarded for completing a wave
  • Hang on to these at least until wave 3 of first pass, possibly until second pass
  • This charm assists in attracting Crimson Commanders of the Marching Flame, increasing how often they're encountered. This charm is consumed upon encountering a Crimson Commander Mouse.
Ultimate Luck Charm

Ultimate Power Charm

Fiery Warpath - Strategies

[ ^ Contents | << Charms ]
First, some general comments.
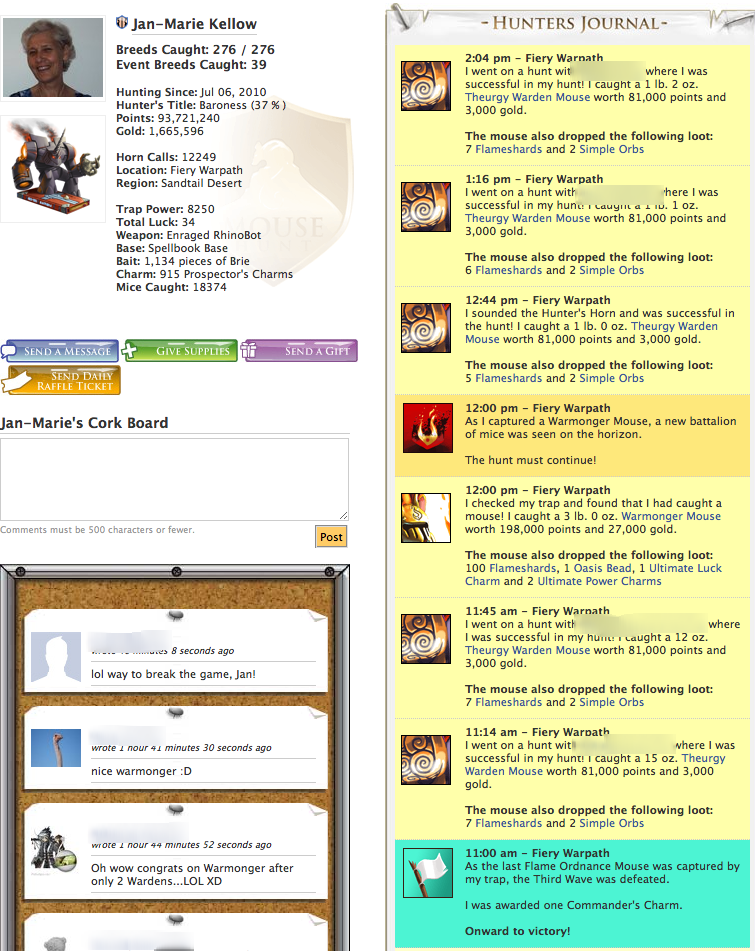
  • The Fiery Warpath is not an area in which a hunter can pick a single setup and stick with it throughout and expect an optimal (or even near-optimal) result. The screenshot below provides an object lesson in this principle: with only Desert Archers left, using charms is wasteful.
  • We are all still learning our way through, so read lots of guides, take what you like and leave the rest. Enjoy the game and do what *you* think you should do.
  • I am just finishing up wave 2, so the later stuff I have sorted out by collaborating with friends who are further along, an understanding of tactics in general, games in particular, etc... YMMV. :)
  • Read the rest of this guide, but especially the sections on Waves and Streaks, before reading this section.

[placeholder:image]
Late in wave 1, your faithful scribe has dispensed with charms altogether and dropped back to gouda, taking advantage of knowledge gleaned from her betters. No need to scramble for every opportunity to catch a Gargantuan mouse when Theurgy Wardens will drop flameshards by the handfull.

I. Active Hunter Strategies:

Streaks are important; so is the 'demoralizing' effect of catching a Crimson Commander; and collecting loot is important as well. How to balance out these various goals?

Which mice should I target?  On the first pass through wave 1, rotate through the mice in the wave, rather than clearing all of one mouse and then moving on to the next.  Try to keep the number of each mouse you have left to capture roughly the same. Obviously, never break your own streak. On the first pass through wave 2, rotate through the archers, scouts and warriors first, as catching a crimson commander will cause cavalry and mages to retreat as well and you have no charms for those mice. You'll end up tackling some Cavalry and Mages at the end and will end up with drops for charms which you can then use in wave 3.

[placeholder:image]
In wave 2, everything is challenging!

What bait / charms should I use?  Vary your bait and charm setup depending on where you are in a streak as well as where you are in a wave.

For example: For wave 1, start out using gouda and no charm and see what you catch. Then arm the regular charm for that kind of mouse, staying with gouda through the third or fourth catch. If you have six or more of that mouse left to go in the wave, switch to the super version of the charm after the fourth or fifth catch. After the sixth or seventh catch, switch to sb+ as well....

In wave 2 (first pass through), I always armed a charm until I was done with the archers, scouts and warriors. I started out with gouda / regular charm for the first two catches, switched to the super charm after the second and switched up to sb+ after the fourth catch. This strategy was combined with ragebot / runic while using gouda, then switching to SBB when switching to SB+. The idea was that I had more invested in the streak as it progressed, so it was worth expending more resources to maintain it.

Another consideration is that sb+ affects the encounter rates for Crimson Commanders and Caravan Guards, which is a possible argument for a sb+ / regular charm setup, especially for hunters with fewer MH hunting friends. "According to the King's scouts, SUPER|brie+ is known to attract more Crimson Commanders and less Caravan Guards."

How do / Should I catch the Gargantuamouse?

Why not just always switch after 6 and avoid the Gaga? Because it drops flameshards, which we believe will be needed to craft the Oasis Water Node, Sphynx Wrath and Monstrobot. On the other hand, the Theurgy Wardens also drop flameshards by the handfull, so you will have to decide for yourself. Once we have the recipes for the new traps, I can give better guidance to this question.

You can tell when the Gaga has been released by watching your streak meter - when it turns yellow, the Gaga is loose. No need to switch setup before then for horn calls. That means that if you have a trap check coming up after your seventh catch, I'm not sure quite what you should do, as trap checks are reported at your designated time (mine is at 0:30) but do not necessarily occur at that time (hence the MouseHunt knows what is going to happen effect). Personally, I think I would be tempted to unbait for the things at present...

The chances of encountering Gaga increase by a polynomial equation (not exponential) as the streak progresses. (I'll give some examples in a future update to show what this means). A possible strategy might be to switch to, for example, a strong hydro setup if the streak meter turns yellow before the ninth catch during the first three waves (hydro being 'less effective' for both Gaga and archers, scouts and warriors), switching to your Ice Maiden (IM) after the ninth catch. With IM and Spellbook base, you have a good chance of catching Gaga. Switch to a luck charm, as you will not catch anything other than Gaga with IM armed.

What trap / base should I use?  Your trap and base depend on what wave you are in, what mice you are targeting, and where you are in a streak (see above.) A strong physical trap is your best friend for wave one, with the exception of when you target Gaga. The ragebot (Enraged Rhinobot) is an ideal trap for the active hunter, as this location rewards consistency, so the ragebot is very likely to outperform the much-beloved Chrome Drillbot, as strength is more consistent than luck. Ragebot / Spellbook base appears to be a terrific physical setup for the location. In waves two and three, you encounter mice that require hydro, tactical and arcane traps. Following the strength over luck in order to maximize streaks approach, we would pick HeatBath (hydro), Zugzwang's First Move (tactical) and ACRONYM (arcane), again paired with Spellbook Base. The Ice Maiden is the only option for Draconic against Gargantuamouse.

II. Passive Hunter Strategies:

Passive hunters will really not be able to manage streaks effectively, so our best thinking on the topic at present is to ignore charms entirely and just collect the mice in the first two waves as they come, recognizing that it will take longer that way. Passive hunters can still benefit from having lots of friends in the area at the same time as they are there, however, preventing reinforcements from arriving.

What about flameshards? You'll get flameshards from the Theurgy Wardens and they are for sale in the marketplace, whereas many items are not... Passive hunters thus have many options to collect flameshards :)